

Product Details
Torque Link Repair Kits for Piper Aircraft
Prevents shimmy by removing looseness in the torque links
- Convenient kits replace all common wear torque link components
- Fits most prop driven Piper aircraft
- Contains all FAA approved parts and standard hardware
- Save time and money! No more research and ordering of individual parts
Can You Stop Nose Gear Shimmy? by Dave McFarlane
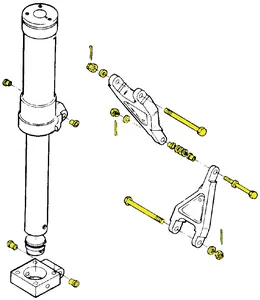
Kit contains:
| 3 Bolts |
| 5 Bushings |
| 3 Cotter pins |
| 3 Nuts |
| 4 Washers |
To improve the fit and function, a few of the standard hardware parts in the McFarlane torque link hardware kit differ from what the IPC calls out.The kit contains UNJF threaded this self-locking castellated nut:
- Qty 1 MS17825-5
This nut is provided in the place of the following UNF threaded plain castellated nut (as called out in the IPC):
- Qty 1 AN310-5.
AC43.13-1B Section 4 paragraph 7.64b explicitly allows this substitution. “Self-locking castellated nuts with cotter pins or lock wire may be used in any system.”
The current Piper IPCs that cover this kit’s eligibility require NAS6604 and NAS6605 bolts in combination with AN310 nuts for nose gear torque link assemblies. The AN310 nut has UNF threads, while the NAS bolt has UNJF threads, which is a fit issue. UNJF threads have a larger root radius than UNF threads, which causes interference when a UNJF external thread is used with a UNF internal thread. When assembled in this combination, the peaks of the UNF nut threads gouge out the valleys of the UNJF bolt threads. To fix this fit issue, the McFarlane torque link hardware kits contain standard hardware nuts that do not match the IPC. This fit issue appears to have been caused by an update to the Piper IPCs where the bolts for these aircraft were changed from AN bolts of UNF thread type to NAS bolts of UNJF thread type, but the nuts were not also changed.
Eligible Aircraft
| Make | Model | Start S/N | End S/N | Qty/Aircraft | Location | Eligibility Chart |
|---|---|---|---|---|---|---|
| Piper | PA-28-201T | 28-7921001 | 28-7921095 | 1 | NOSE WHEEL | 6607 |
Part Number Information
Additional product information
Approval: Kit with Approved Contents
Product Documents
Frequently Asked Questions
How do you remove torque link bushings to install new ones?
Removing the flanged bushings from the torque link forging can be difficult as there is not a good surface to press against or grab onto. An easy way to remove them is to thread them with a tap, screw a bolt in the thread you made, and then drive or press against the bolt. The thread does not have to be a full depth thread for the bolt to hold securely in the bushing. The bushing material is somewhat hard, but not so hard that a standard hardware store tap will not do the job. Use cutting oil on the tap to prevent tap damage. Normally the bushing will then come out easily. For stubborn bushings, soak the link assembly in boiling water before pressing the bushing. The heat will expand the aluminum forging more than the steel bushing. This helps loosen the press fit while limiting the temperature to prevent from overheating and harming the heat treat of the aluminum forging. A controlled oven can be substituted for boiling water as a heat source, but do not exceed 350° F. Do not use flame or other non-controlled heat sources. An alternate method is to put dry ice in the bushing before driving or pressing on the bolt you threaded into the bushing. Do not over-press or hammer as the aluminum can gall to the bushing and leave a damaged bushing bore. If the bushing does not come out with light to moderate force take the time to use some heat or cold to help.
I installed a torque link kit and serviced my shimmy dampener; why do I still have a shimmy problem?
There are many components all connected to keep the nose gear in line. If one component is worn or out of tolerance it can cause shimmy problem. Reference Dave McFarlane’s article: Can You Stop Nose Gear Shimmy instructions and suggestions. Overlooked items also include the rod ends, shimmy dampener mounting and attachment, shimmy dampener, and steering collar. The steering collar is where the steering rod tubes connect and the upper torque link is attached to, along with the shimmy dampener on most aircraft. If the steering collar has play vertically and laterally and is allowed to tilt; that will cause excessive wear and force on the torque links, steering, and strut components. There are three different thicknesses of shims to help get the collar in place. Ensure that the shimmy dampener is working properly with no dead spots in dampening action. The cylinder could be worn on the inside or on a piston that warrants replacement of components. All of the nose strut components are tied to each other and any movement is transmitted through to the tire and back through the dampening system, which if remedied will continue to be more pronounced.


